

Monday, June 11, 2012
Nursery Design
I have a few design projects going on and I thought I'd show you one of them today. This is for a friend of mine who is expecting a baby boy. There isn't a theme, but we've been working with sort of a Gulf of Mexico/Nautical theme. The color palette is mainly shades of blue, green and light neutrals. To give the room a pop of color we are thinking of painting the Ikea dresser green. I think the room is going to turn out so cute!


Friday, June 8, 2012
Swing Table

Thursday, June 7, 2012
Blongo Ball

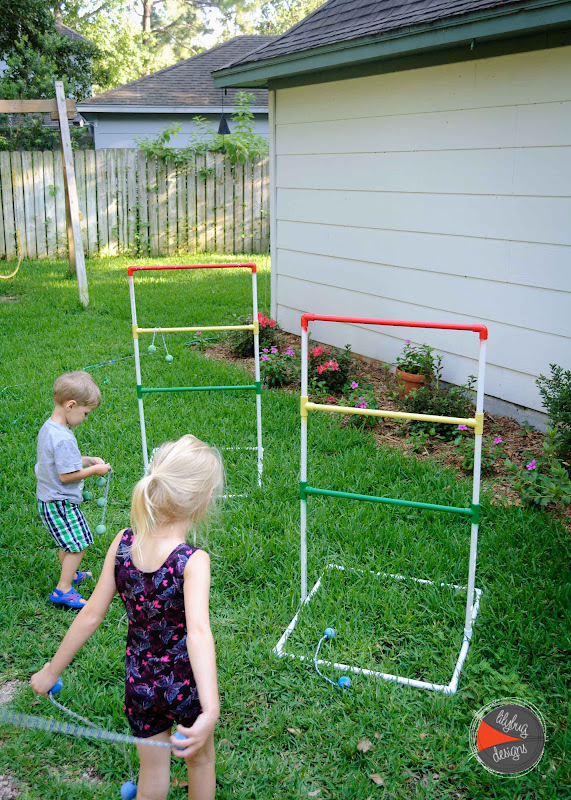
So, I can't take any credit for this project. It was all my husband's handiwork. This game is called many names, Laddergolf, Blongo Ball, Bolo Ball or Polish Horseshoes. We call it Blongo Ball. He made this game to entertain the adults, but the kids loved playing it just as much. It was all made from PVC pipe and fittings. Then each tier was sprayed with paint specifically for plastic. We purchased the blongo balls and went with the soft kind since I knew kids would be throwing them around as well.
At some point I'll get around to posting a project I completed. I finished two projects recently and gave them away before I photographed them. I should have some paintings up next week for you all to see.
Saturday, June 2, 2012
Kindergarten Graduation
My little girl graduated from Kindergarten this past week and I can't believe this year went by so quickly. It just amazes me that she'll be a first grader next year. Where does the time go? Now I just need to find a way to keep my kiddos busy this summer. I see many days filled with swimming at the pool, riding bikes and heading to the beach to play. I promise I'll get some projects done and keep blogging. I'd just like to make sure we all have a little fun before she heads back to school in the fall as a first grader. Yikes!


Lily with the Principal and Father Nguyen

Lily and her Kindergarten teacher.
Monday, May 21, 2012
Camping Birthday Party
I've been completely neglecting the blog lately because of all the end of the year school stuff. Doesn't everything seem busier the last month of school? Of course we also threw a birthday party into that mix as well. As you've seen in my previous posts, we were gearing up for a Camping Birthday Party. My daughter loved it and even told me that it was the best birthday party ever before she fell asleep. Aww, it makes all the work worth it.
 Here is a picture of the tents that we set up in the backyard. The kids loved running in and out of them. My parents made a fake fire using a light, fan and cellophane.


I went with picnic type table cloths on all the tables.


Here are the twig covered pots that I made and used as centerpieces.


I made a little clothesline with pictures from previous years.

The awesome cake that Moeller's Bakery made. My daughter loved it! It has a Fisher Price camping set on top of the cake. My mom and dad found this and had them added to the cake. They had these really cool candy rocks on top of the cake. The kids loved them.

The kids made pet rocks. They also had a bug hunt at the beginning of the party with fake bugs.

The enjoyed running around with their binoculars that I made for them.

They all took a whack at the Bee Hive Pinata.


My favorite part was the musician that came to sing. Andrew is fantastic and he has such wonderful children's songs. You should check him out at his website, here.
It turned out to be a fun party and I am so glad my daughter went with the camping theme. The boys and girls from her class really seemed to enjoy it.
Wednesday, May 16, 2012
Bee Hive Pinata
I think you can all call me CRAZY now. I decide to make a pinata. I know, I know, I can buy a pinata, but I really wanted a bee hive pinata. Since it's a multiple step process you don't really think about it taking up that much time. That being said, you have to start working on it a few weeks in advance. It's really not that hard and of course the internet has tips, tutorials and recipes on how to make a pinata.
First step, blow up a balloon. I wanted a big pinata and bought a punch ball balloon to use. I found a tip via Pinata boy about wrapping the balloon in newspaper and tape first before coating it with paste. You need to check out his pinatas they are fantastic! For the paste I used both the cooking method and the non-cooking method. According to the internet, cooking the paste makes it stronger, but I still like the non-cook paste. After the newspaper dried, I cut more newspaper into strips and dipped them in the paste and started layering it on after it was covered I let it dry again. I continued this process until the pinata felt solid.

Next I painted it yellow. To cover the newspaper print up you need to mix white paint in with the yellow. Now I began the process of gluing crepe paper on to the pinata. I just rolled it on and glued it. After that was done I created the fringe with my scissors and fluffed it up.

Now you are ready to fill your pinata. Cut a U-shaped hole to fill it up with candy. I put mine at the top and threaded string through it a the same time so I could hang it later. I also found a tip that said to put the string through a straw so it wouldn't rip out of the pinata as easily. Then you can tape the hole up and put crepe paper on top to cover it.
Now it's time to make the bees. What's a bee hive without some cute bees flying around it. I created the bees from pipe cleaners. To make the bees that look like they are flying I put an extra pipe cleaner on it and poked it right into the bee hive. Cute, right?
Tuesday, May 8, 2012
DIY Binoculars

DIY binoculars is a very easy project and so cute for the kids to play with during the summer. We took a 12 foot -1" PVC pipe and cut it into 4" sections. Then I used the duct tape with all the cool designs and wrapped each PVC piece and taped two together. Once that was done, I drilled holes on to the sides and threaded ribbon through the holes to make a strap for the kids to hang it around their neck. The binoculars makes a cute inexpensive party favor for a camping party.


I see you!
Subscribe to:
Posts (Atom)